How To SSH Into Raspberry Pi Over The Internet: A Comprehensive Guide
Accessing your Raspberry Pi remotely over the internet using SSH (Secure Shell) is a powerful tool for managing your device from anywhere in the world. Whether you're a tech enthusiast, developer, or hobbyist, this guide will walk you through the process step by step, ensuring a secure and efficient setup.
SSH is a protocol designed to provide secure communication between devices over an unsecured network, such as the internet. By enabling SSH on your Raspberry Pi and configuring it properly, you can remotely control your device without needing physical access. This is particularly useful for projects that require off-site management or monitoring.
In this article, we'll delve into the details of how to SSH into Raspberry Pi over the internet. You'll learn the prerequisites, setup steps, security considerations, troubleshooting tips, and much more. Let's dive in and explore the world of remote Raspberry Pi management.
- Elon Musks Parents Nationality A Comprehensive Exploration
- 5th Third Bank Customer Service Your Ultimate Guide To Seamless Banking Experiences
Table of Contents
- Introduction to SSH
- Raspberry Pi Overview
- Prerequisites
- Enabling SSH on Raspberry Pi
- Configuring Your Network
- Using Port Forwarding
- Securing Your SSH Connection
- Alternative Methods for SSH
- Troubleshooting Common Issues
- Conclusion
Introduction to SSH
SSH, or Secure Shell, is a cryptographic network protocol that facilitates secure communication between devices. It encrypts data exchanged between the client and server, ensuring confidentiality and integrity. Understanding the basics of SSH is crucial when learning how to SSH into Raspberry Pi over the internet.
SSH not only allows you to remotely access a terminal session on your Raspberry Pi but also enables file transfers and other secure operations. With SSH, you can execute commands, manage files, and monitor processes as if you were physically connected to the device.
Why Use SSH for Raspberry Pi?
Here are some reasons why SSH is essential for Raspberry Pi users:
- Floyd Mayweather Weight Height The Ultimate Guide To His Physical Stats And Boxing Career
- When Was Joe Biden Born A Comprehensive Look At His Birth Life And Legacy
- Remote Access: Control your Raspberry Pi from anywhere in the world.
- Security: SSH encrypts all communication, protecting sensitive data.
- Efficiency: Perform tasks quickly without needing physical access to the device.
- Automation: Use SSH to automate scripts and tasks on your Raspberry Pi.
Raspberry Pi Overview
The Raspberry Pi is a versatile, low-cost single-board computer designed for a wide range of applications, from home automation to complex server setups. Its compact size and affordability make it a favorite among hobbyists, educators, and developers alike.
When setting up SSH on your Raspberry Pi, it's important to understand the device's capabilities and limitations. The latest models, such as the Raspberry Pi 4, offer improved performance and connectivity options, making them ideal for remote management tasks.
Key Features of Raspberry Pi
- Processor: Powerful ARM-based processors.
- Memory: Options ranging from 2GB to 8GB of RAM.
- Connectivity: Built-in Wi-Fi, Bluetooth, and Ethernet.
- Storage: MicroSD card slot for expandable storage.
Prerequisites
Before diving into the setup process, ensure you have the following prerequisites in place:
- A Raspberry Pi device with the latest version of Raspberry Pi OS installed.
- A stable internet connection for both your Raspberry Pi and the client device.
- A client device (e.g., laptop, PC) with SSH client software installed (e.g., PuTTY for Windows or Terminal for macOS/Linux).
- Basic knowledge of networking concepts, such as IP addresses and port forwarding.
Software Requirements
Ensure your Raspberry Pi is running the latest version of Raspberry Pi OS. You can download it from the official Raspberry Pi website and install it on your microSD card using a tool like Balena Etcher.
Enabling SSH on Raspberry Pi
Enabling SSH on your Raspberry Pi is the first step toward remote access. Here's how you can do it:
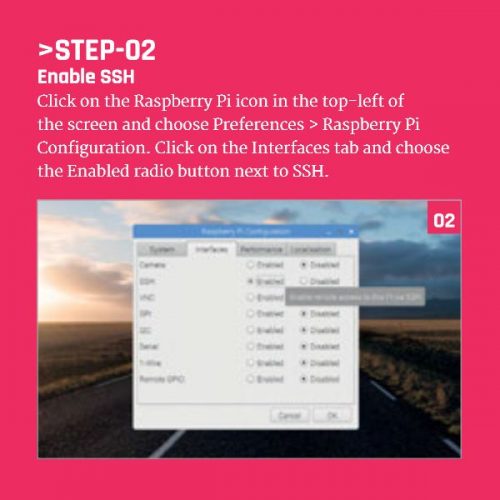
Using Raspberry Pi Configuration Tool
- Open the Raspberry Pi Configuration tool from the Preferences menu.
- Navigate to the Interfaces tab.
- Select "Enabled" next to SSH and click OK.
Using Terminal
If you prefer using the command line, follow these steps:
- Open the terminal on your Raspberry Pi.
- Enter the following command to enable SSH:
sudo systemctl enable ssh. - Restart your Raspberry Pi with the command:
sudo reboot.
Configuring Your Network
Once SSH is enabled, you need to configure your network settings to allow remote access. This involves obtaining the local IP address of your Raspberry Pi and setting up port forwarding on your router.
Obtaining the Local IP Address
To find the local IP address of your Raspberry Pi, use the following command in the terminal:
hostname -IThis will display the IP address assigned to your Raspberry Pi by your router.
Using Port Forwarding
Port forwarding allows you to direct incoming internet traffic to your Raspberry Pi. Follow these steps to set it up:
- Log in to your router's admin interface using its IP address.
- Navigate to the port forwarding section.
- Create a new rule to forward port 22 (the default SSH port) to the local IP address of your Raspberry Pi.
- Save the changes and restart your router if necessary.
Alternative Ports
For added security, consider changing the default SSH port from 22 to a non-standard port. This reduces the risk of unauthorized access attempts.
Securing Your SSH Connection
Security is paramount when accessing your Raspberry Pi over the internet. Here are some best practices to enhance the security of your SSH connection:
- Use Strong Passwords: Ensure your Raspberry Pi's password is complex and difficult to guess.
- Disable Password Authentication: Switch to key-based authentication for added security.
- Update Regularly: Keep your Raspberry Pi OS and SSH software up to date with the latest security patches.
- Use a Firewall: Configure a firewall to restrict access to your Raspberry Pi.
Key-Based Authentication
Key-based authentication involves generating a public-private key pair and using the public key to authenticate with your Raspberry Pi. This method is more secure than password-based authentication.
Alternative Methods for SSH
While port forwarding is a common method for SSH access, there are alternative approaches you can consider:
- SSH Tunnels: Use SSH tunnels to securely connect to your Raspberry Pi through an intermediary server.
- Third-Party Services: Services like ngrok or PageKite allow you to create secure tunnels without configuring port forwarding.
- Dynamic DNS: Use a dynamic DNS service to assign a fixed domain name to your Raspberry Pi's IP address.
Troubleshooting Common Issues
Even with proper setup, you may encounter issues when trying to SSH into your Raspberry Pi. Here are some common problems and their solutions:
- Connection Refused: Ensure SSH is enabled and the correct port is forwarded.
- Permission Denied: Check your SSH keys and ensure the correct permissions are set.
- Timeout Errors: Verify your network connection and ensure no firewalls are blocking the connection.
Conclusion
Learning how to SSH into Raspberry Pi over the internet opens up a world of possibilities for remote management and automation. By following the steps outlined in this guide, you can securely access your Raspberry Pi from anywhere in the world.
Remember to prioritize security by using strong passwords, enabling key-based authentication, and keeping your software up to date. If you encounter any issues, refer to the troubleshooting section for solutions.
We encourage you to share your experience with SSH and Raspberry Pi in the comments below. Don't forget to explore other articles on our site for more tips and tricks on leveraging the power of Raspberry Pi. Happy tinkering!
- Guardians Of The Galaxy Vol 2 Cast A Comprehensive Guide
- Woody Mcclain Wife Age A Comprehensive Look At Her Life Career And Relationship
Enable SSH on Your Raspberry Pi

How to Connect via SSH to a Raspberry Pi Tony Teaches Tech

How To SSH To Raspberry Pi Over Revised 2025

